TL;DR: Managing Kubernetes is not an easy task, but with the right choices and measures in place, upgrading Kubernetes with zero downtime from one version to another does not have to be all that hard.
How did we arrive at Kubernetes?
In the past, we used to treat our servers, as if they were pets. Pets need to be kept alive, nursed, and cared for, and when they got sick, they required additional attention. This was time-consuming and did not quite go hand-in-hand with the pace the industry was moving.
Eventually, the servers got virtualized/containerized and now mostly live in the clouds. We have changed our mindset from considering our servers as pets to more like operating or managing a herd of cattle. When dealing with applications made up from multiple (even hundreds) of microservices, there is no time to deep-dive into why one of them has “personal” issues. The service is often simply restarted, which the other (micro)services need to be able to handle as well.
Many attempts have been made to define the tools and systems for managing and maintaining our “cattle”. Currently, the industry has landed on containers and Kubernetes as its main orchestration platform.
What does it actually mean to manage a Kubernetes cluster?
To manage and maintain your “cattle” is no simple task, even with systems like Kubernetes in place. Just take a look at the official diagram of components within a Kubernetes cluster below. Quite a few to dig into and keep track of!
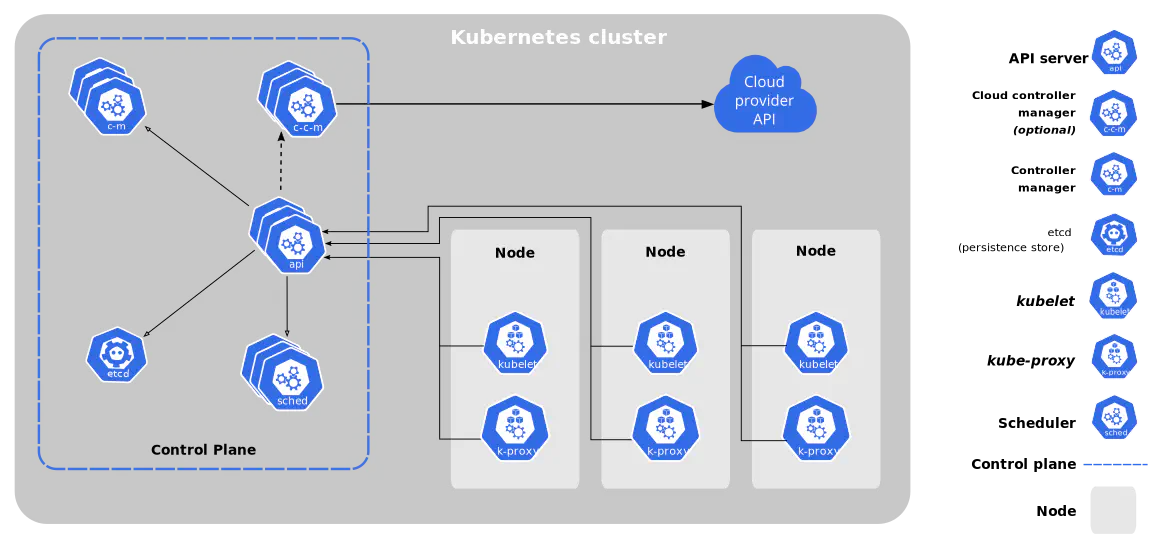 Source: Kubernetes
Particular the so-called “Control Plane” can be a tough set to maintain. Luckily many of the larger cloud providers like AWS, Azure, Google, and DigitalOcean, now supports this as managed components.
To have the Control Plane managed by your cloud vendor will take some load off your DevOps personal. But you will probably find that you will also have to school your developers in technologies like Docker/Podman or similar (Docker layers you say?). There will be a whole lot of different deployment manifests to learn (what Kind should we use? And why?). Remember to add resource requests & limits (We are in the cloud! What’s the limit?). You’ll need a health check for your application (What is a liveness probe anyways?). You will not have SSH access to your application (But how can we debug then?!). Finally, your application should be able to handle being restarted and moved around from one server to another!
Then comes of course the choices for CD tools, whether or not to include some extra service mesh for added security, you want to define RBAC and SSO for accessing the cluster. The list goes on and on.
There is a lot of things to learn and take into account when it comes to managing and running a Kubernetes cluster.
One golden rule, which should hold true for any environment, not only Kubernetes, make sure to have multiple clusters running. Experiment with patching/upgrading on a non-production cluster, before performing anything in production!
Upgrading Kubernetes
So, with all the “make sure you know what you are getting into“-talk out of the way, let’s talk about what you are actually here for. How to upgrade Kubernetes with zero downtime.
A good API is made backward compatible, at least on its minor and patch versions. This holds through for the Kubernetes API as well.
When we talk about updating the API for Kubernetes, as you can see from the component overview, that we are talking about updating the “API server”. The API Server is part of the Control Plane. Again, as mentioned, many cloud providers now manage the Control Plane for us. All of them let us perform upgrades on this with a single click or a single command line.
For AWS the upgrade option looks like below:
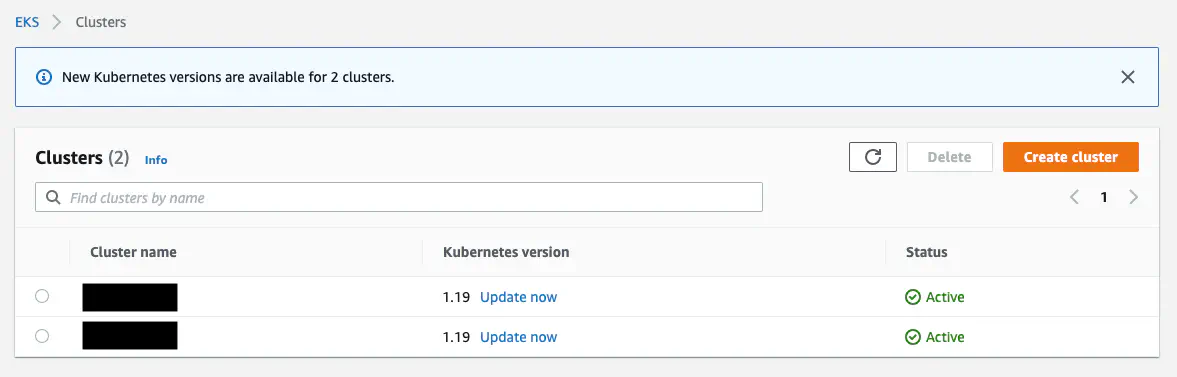 It is important to know, that while the Control Plane is upgraded, access to the API is not available. This does not impact the workload in the cluster and does not mean that your worker node is upgraded as well.
When upgrading your Control Plane, say from 1.18.x to 1.19.x, you will run worker nodes using the older API version (1.18.x in this case) of the Control Plane API (backward compatible). This is the easy part. Now you’ll need to upgrade the worker nodes.
Similar to upgrading the Control Plane, your cloud provider might have a simple button or command line for upgrading your worker nodes. But before you do, you should familiarize yourself with a few concepts.
Chances are that upgrading your nodes is done in a simple “rolling fashion”. What this means is that each node (or node pool) is detached from the cluster while being upgraded, and then reattached afterward. This removes a “node size” amount of resources available in your cluster while upgrading, which eventually can lead to pods not being schedulable. You’ll have downtime.
You would more likely want to go for a “Surge Upgrade“. With this method, a new node (or node pool) is added to the cluster, and workload will be migrated to this before the old node(s) are being removed from the cluster.
The “Surge Upgrade” feature might not be the default behavior and that you have to actively enable it.
Or you might also find that this feature is simply not available (eg. you are running vanilla Kubernetes on–premises etc.). In this case, you want to get to know the concept of “cordoning” and “draining” a node.
Using “cordon”, “draining” and “PodDisruptionBudgets” to ensure zero downtime
As an example, let’s assume we have a small and simple cluster, consisting of only 2 nodes. This would be our initial state, before the node upgrade:
❯ kubectl get nodes
NAME            STATUS   ROLES    AGE   VERSION
workers-82kk2   Ready             22d   v1.18.xx
workers-82kkp   Ready             22d   v1.18.xx
We can run the command below to mark each individual node as “cordoned”.
That a node is marked “cordoned” simply means that no new workload can be scheduled on it.
❯ kubectl cordon workers-82kkp
node/workers-82kkp cordoned
The new state would look like this (of course both nodes should be cordoned before continuing):
❯ kubectl get nodes
NAME            STATUS                                  ROLES    AGE   VERSION
workers-82kk2   Ready                                            22d   v1.18.xx
workers-82kkp   Ready,SchedulingDisabled                         22d   v1.18.xx
Now having disabled scheduling for the old nodes, you should add new nodes (eventually having a cluster 2 x starting point).
Usually, and assumed, your worker nodes would be attached to an AWS auto-scaling group (or the like). Updating the auto-scaling groups “Desired capacity” to 2 x default will bring up new nodes, which now match the upgrade version (matching the control plane).
❯ kubectl get nodes
NAME            STATUS                                    ROLES    AGE     VERSION
workers-82kk2   Ready                                              2m11s   v1.19.xx
workers-82kkp   Ready                                              2m22s   v1.19.xx
workers-863h5   Ready,SchedulingDisabled                           22d     v1.18.xx
workers-863k2   Ready,SchedulingDisabled                           22d     v1.18.xx
As you can see from above, the new nodes are not marked “cordoned” and hence workload can be scheduled on them.
We can migrate the workload from the old nodes to the new nodes using the “drain” command:
❯ kubectl drain workers-863h5
Kubernetes will then look for nodes having the state “Ready” and reschedule deploying pods from the draining node to those.
Another nifty feature to take into account here is the so-called “PodDisruptionBudget” — A “PodDisruptionBudget” is a simple manifest letting Kubernetes know how it should handle “disrupting” a deployment.
Basically, you can define “minAvailable” or “maxUnavailable” number of pods. In the following example, let’s assume that we have 2 pods running the “image-service”, one on each node in our imaginary cluster.
By defining minAvailable: 1 Kubernetes will, during the “draining”, ensure that at least one pod is kept alive on an old node while one pod is being migrated to the new node. Not until the migrated pod is up and running on the new node, will the other pod be migrated.
apiVersion: policy/v1beta1
kind: PodDisruptionBudget
metadata:
  name: image-service-pdb
spec:
  minAvailable: 1
  selector:
    matchLabels:
      app: image-service
And that’s basically it! The short cheat sheet would look like this:
- Use a managed control plane whenever possible
- Make sure to enable “surge upgrades” when possible
- Get familiar with the commands “cordon” and “drain”
- Remember to use a “PodDisruptionBudget” for your deployments